Where does the time go? It seems only like a few weeks ago I was bringing you up to date with the latest on the Golf when in fact it was February! Those who have been following our build will recall the oddball nature of what we are doing, but if you need to sharpen your memory you can see some of the earlier build stories here. Or the short version of the story is we are building a Honda Civic x VW Golf mash-up…
Yes, you are looking at a Golf, but it’s really a Honda Civic EP3 Type R! Jonathan Moore, the Speedhunting superhero paid us a visit this week and kindly took some pictures to show the latest updates.

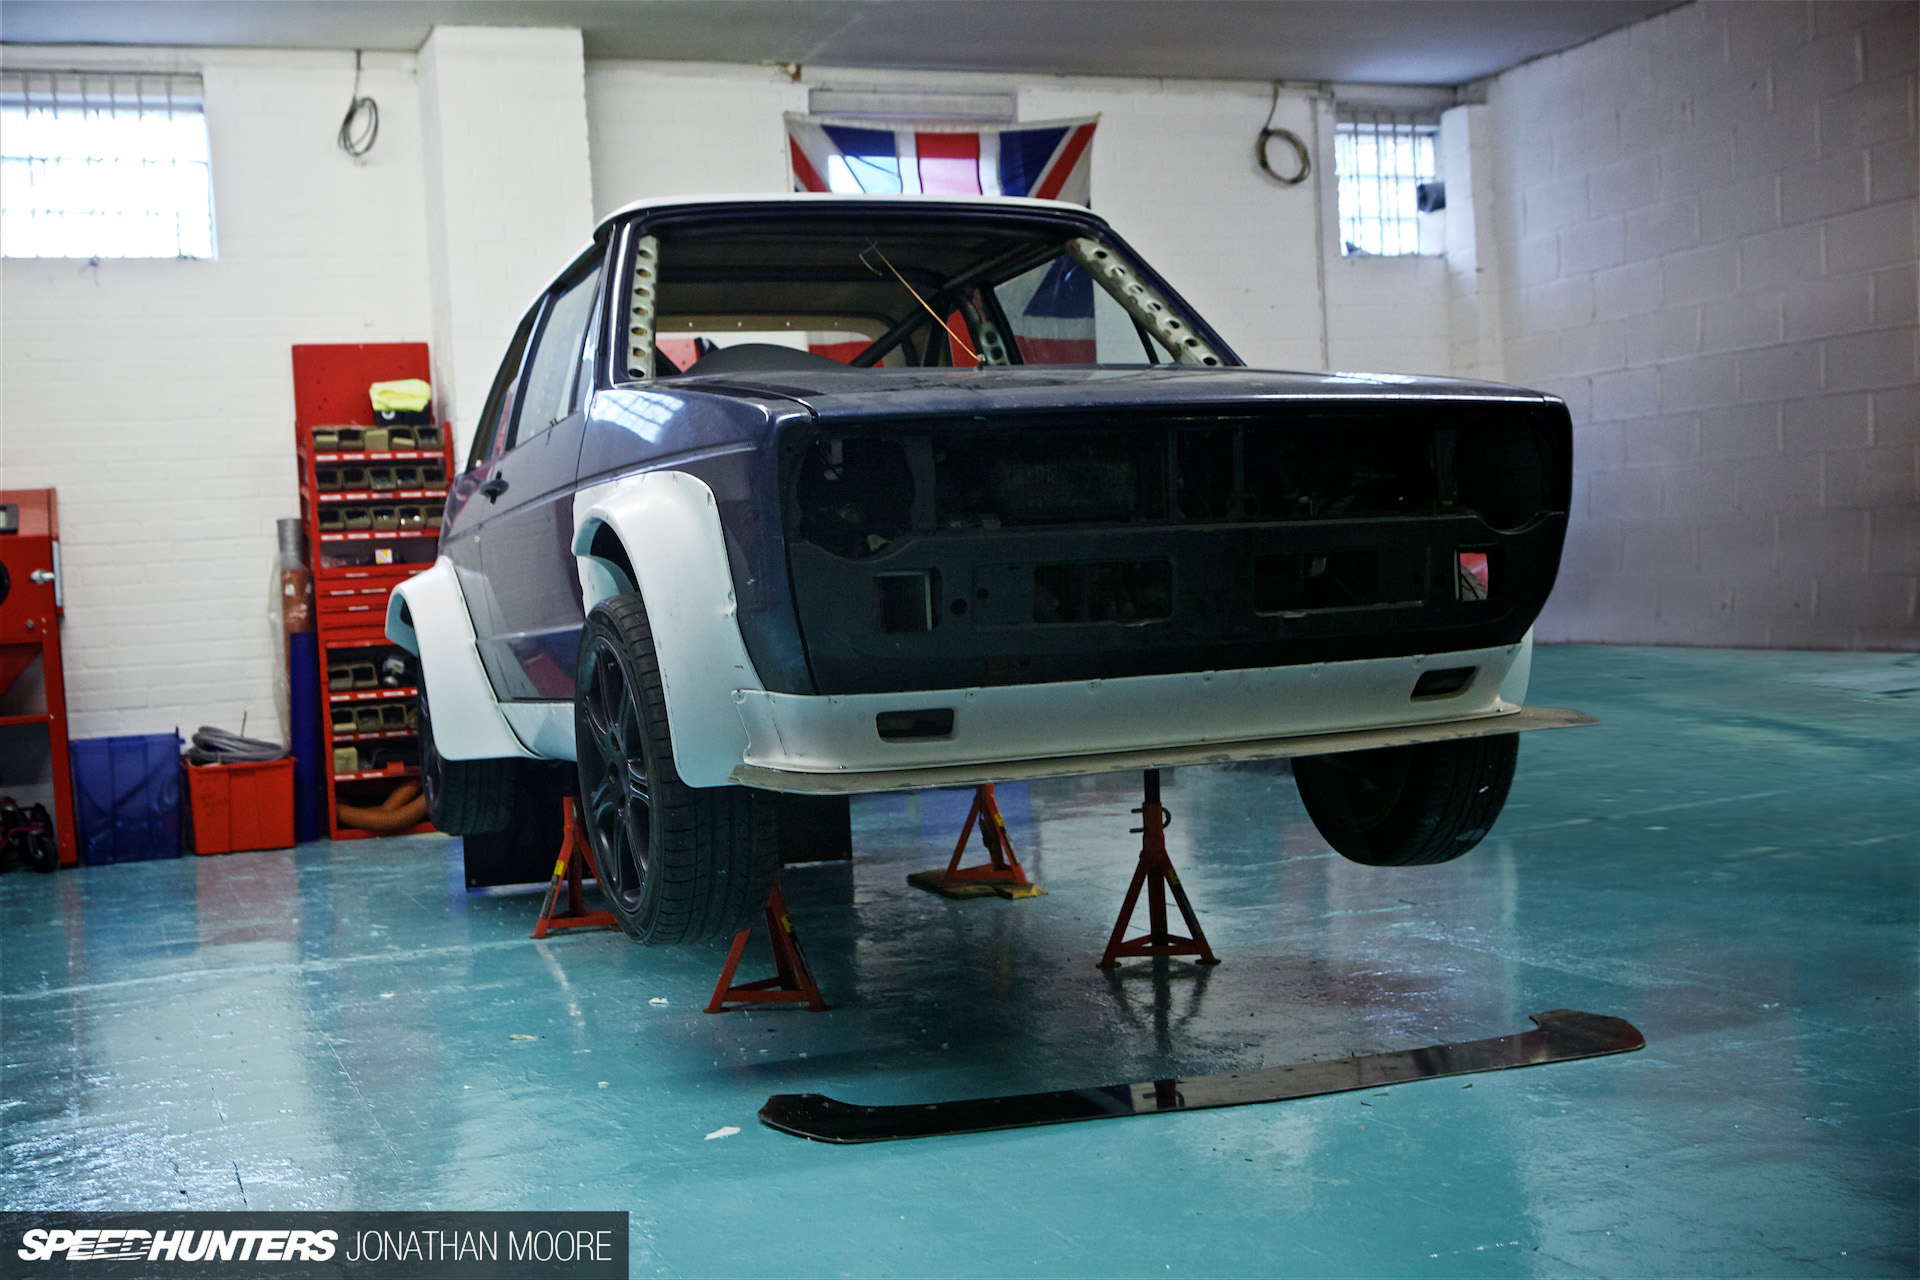
Progress of the car has been at a walking pace in recent months. I never gave the guys doing the fabrication a deadline to work with, and frankly, life has been busy all year so it’s been a comfortable pace of progress as fair as I am concerned, happily trickling away out of sight. The car has returned from hundreds of hours of fabrication work and is now back home in our own man-cave, ready for some actual car building to start. We are now at the stage where a lot of the jobs I showed you last time are complete, and we’re starting to assemble parts and test fit some items. This installment is all about just that.

Until this point the whole build progress has been about mating the Golf and Civic together before we could even consider getting on with the actual specifics of the build, but in this time we have found some clarity on a few issues which I didn’t really have answers for, including what we will do with the car when it’s complete, which obviously affects how we spec and build it. One major decision is that we will definitely do a bit of Time Attack with the car when it’s not doing other Speedhunters or Kleers things on track, therefore cage decisions and some tech stuff have been considered to make sure we can, and it’s been assembled with that in mind.
Considering our wide fenders from KM4SH were made two years ago and are yet to see the light of day in real terms, a lot of over-fender craziness has occurred around the world in that time. I don’t know about you but I’m not interested in building ornaments, this thing needs to shift along and I am not interested in creating yet another fancy paint job, stance and over-fender build. Yes, we have a bit of that, but this thing will be for real – down and dirty despite its looks being a bit late for the over-fender party.

We currently have the car up on axle stands while we begin to prepare other areas for parts exchange or upgrades, particularly the running gear. Items such as sub frames, hubs, bearings, bushes, arms, rods, piping – all that ‘stuff’ is coming off to be worked on or replaced. One of the big draws to me for using the chassis of the Civic EP3 is that we can use a lot of off-the-shelf parts without the need for even more fabrication and one-off headaches. It’s a great little chassis with wide options of parts that are now well proven that you can just use and get the best out of the chassis – pretty simple stuff. Why over complicate things he says after mating two cars together…

With the car on axle stands and the suspension on full droop the car does look a bit odd, but how it looks will have to wait for now as we know when it hits the floor again it will be a very different game. You can see here some of the extra finishing that has occurred since the last update – namely the original fuel filler position has been welded up as it now gets its fuel feed elsewhere.

You can also see some detail of the new CSF radiator exit area which used to be the boot lid and house the number plate. A ton of fab work has occurred here, and although it looks like a simple little job it wasn’t. We managed to really make the CSF radiator work for us on the chassis and I must thank Ravi at CSF for all his help so far. The boot lid still has the option to open for repairs, but it’s now managed by a captive bolt arrangement. Later on two large fans will be sat on this side of the radiator to help things along, as recommended by Team Tardy on a previous visit.

The other side of the radiator tells a different story. It has a fabricated box channeling air from under the car through the radiator and aided by the pair of fans we are yet to install. Hopefully this level of flow and the big fans along with a lot more volume of water in the pipe system will never cause any heat issues for our engine. We now need to look at piping and an electric water pump system. The area in front of the box will house our fuel pumps and swirl pots later on.
Mad Max Meets Death Race
One outstanding issue which is undecided is the rear window section in the new KM4SH roof. Currently it’s just open and we have a few ideas of how to finish up this space; maybe some Mad Max type venting instead of a window, Death Race style. We’ll see…

This picture shows the cut-out section in the front wings which is standard for the KM4SH kit. Again, this simple feature hides the removal of original panel work from the car in order to obtain this feature. The area behind this open section will no doubt become stone-chip city on the first pass over a gravel trap.

I wont lie, the roof has been a nightmare. It was made to fit as you see, short of the original roof line at the rear, but the instructions or indications as to how it was supposed to attach to our car have been sketchy at best. Well, worse than that – non-existent. I could have asked questions about it, but as we were doing some custom fabrication in this area we just got on with it in a way which would see it fit firmly and with rigidity once installed, and it’s turned out for the best.

Here is the new inlet for fuel – an FIA dry break filler system which feeds a larger diameter pipe to the tank. It wasn’t entirely necessary to fit this for the sake of any regulations or endurance refueling etc, but I like it and installed one on some of our other cars in the past. I like having this feature as it’s neat, professional and safe. It took a bit of brain power to get it to plumb correctly on the opposite side of the car, but the boys at Hauser nailed it. It had to go on this side as the fuel tank is the original from the Civic and it all pointed to the opposite side to the Golf.

Here’s the inside view of the dry break filler, it has the flexi-tube covering the actual fuel pipe to act as a fire wall for the regulations considering it’s inside the car.

This picture gives you a better idea of the amount of angles and curves installed in the roof – it’s like it changes shape depending on what angle you view it from. You can also see another issue we have to address with the rear quarter windows. The Golf has these pieces of glass winding down to about half way, but we will be ditching the glass and replacing with Lexan; the question is if we keep them movable or not. They look good up when the roof is on, but when you take the roof off… not so much. Windows up in a convertible look a bit naff, so we need to think about this some more. All the other ‘glass’ will be replaced with formed Lexan.

Here you can see some of the major work required to mount the roof in a way that it’s nice and rigid and can still be removed fairly quickly. This entire section has to be cut away and a new arrangement fabricated. We considered using DZUS fasteners but in the end just used bolts to fix the roof here.

We finally test-fitted the front lip arrangement which brought the kit together for the first time, and I really like the angles it has. It fouls small areas of the Civic chassis legs and will need a trim, which is only due to our project complexity, but overall it looks ace on the car in person.

It’s funny how the smallest of things can create the biggest challenges. We wanted a centre wiper on the car, but finding a wiper motor that clean sweeps 180 degrees proved to be a headache, therefore creativity was required. The original motor was moved and installed with extra fabrication of rods and angles to get the desired sweep. You can see the bit of straight rod attached to the motor spindle which was used to test the sweep. The good news is, it’s sorted and the original wiper motor holes have been welded up out of sight. You can also see our OBP remote reservoirs for the brake and clutch systems in this picture, mounted to the bulkhead.
You can also see another little job that has been finished since the last time; the roll cage gussets that we previously installed were functional but a bit questionable in the looks department. I got the guys to pull them off and re-do them as they massively effect the visual pleasure of the car from the outside, and I am now happy!

The EP3’s standard Honda K20 is to remain for now. The guys at TDI North (a main and proper Honda tuning shop in the UK) are lined up to build the engine for me, which in all fairness is a walk in the park for them and our K20. These days 600hp is pretty much considered an upgrade, not extremism. Big single turbo goodness is in the pipeline, which reminds me of a call I owe to HKS.

Here you can still see the mash-up: silver is Civic, blue is Golf. Conversations are now underway with my friends at Bilstein to spec out and supply us with some race suspension for the car. I can’t wait to see what we end up with, so hopefully they come up trumps for me. We will be adding extra welds and struts here in future too.
Are You Sitting Comfortably?
You recall I told you about our seats, right? Well, here they are, and what lovely things they are too. We went with these as our car will no doubt get a bit damp inside from time to time, and I am really pleased we did. Tillett Racing Seats did us a bit of a deal on them and now they sit with the harnesses of all harnesses – Schroth Racing. I know we made the right choice. The whole black and yellow thing is striking, but above all we have some solid safety features, all FIA spec.

The first time I used Schroth belts as a driver was in the factory Honda car I drove in the 24hrs of Silverstone a few years ago, and it was amazing how much of a difference well-made belts can make when you pull on them, loosen them and unbuckle them. All those things are really important considerations as you are faced with lots of choice of belts meeting FIA standards, and after that generic safety standard and function you need to pay attention to how they work.
Okay, the guys at Schroth are good friends and I should mention that, but they are friends from choice – the stuff is amazing, and if you have some in your car you’ll know what I am talking about. From one racer to another – if you have belts that snag and are hard to adjust with ease and you find yourself having to use your chest to loosen your belts when you have them on, get Schroth in your life.

The belts are just mocked up for now while we figure out routing and spaces for other equipment and features, but they secure on the rear bar of the cage ‘X’ cross on both driver and passenger sides. We have a passenger seat to full regs as we want to take people out for Speedhunting duties, but also in Time Attack a passenger seat is compulsory.

The harnesses also came with the floor fixings, clips, and instructions if we needed to use them. That massive sticker you get in the box went straight on my Snap-on tool box lid.

More details and this time the brakes. Being a Brit I get excited by the nature of using British-made parts, and these OBP pedals are the real deal. We managed to get them in the car with good positioning and central to the steering wheel, and also made up a footplate for my heels to rest on which will have some grip tape installed later on to stop my feet slipping at the base.

CNC-milled heaven right there. OBP also supplied cylinders and reservoir pots too, which are mounted under the foot rest and the latter are mounted in the engine bay bulk head outside of the cabin to meet Time Attack regulations.

More OBP goodness in the form of brake cylinders and a brake bias valve. It’s the sort of quality that you just want to keep touching. Odd.

Now some of the fun stuff begins, and by fun stuff I mean getting new shiny parts in the post to unwrap and fit to the car. The collection of new parts for the car is growing into a tidy mountain on the shelf and I cant wait to get stuck in. Of course, everything needs to come out of the box, be touched, admired and put back in again until you need it. Standard car nutter stuff, right? New bits = excitement!

One of the very first sets of equipment for our car to arrive were the complete set of bushes and anti-roll bars from the guys at SuperPro. Without exception, every car I have made has always featured some SuperPro gear in one form or another. The bushes for the EP3 are extensive and come as a full set or individually, but it’s the anti-roll bars where SuperPro stepped up and surprised me with. Not surprising that they now makes bars, but surprising that they didn’t have them for the EP3 and went out of their way to make some for me from scratch when I asked and they couldn’t give me a solution off the shelf.
I sent my bars all the way to Australia via SuperPro Europe and a couple of weeks later they air-freighted a new uprated set back to me after taking measurements from the stock ones. I haven’t installed or tested them yet of course, but if the ‘norm’ performance of SuperPro stuff is to be expected, they are going to bolt straight on and work perfectly from the get go. Massive thanks to all the guys at SuperPro for pulling out the stops and giving me a decent solution. The good news is that the Roll Control bars they made for me are now part of SuperPro’s catalogue line-up, so if you have an EP3 Civic, your dreams are now real – get some in your life. When I start fitting these bits I will show you more.

Next up on my list was sorting out some electrical components. Back in the day I used to have a team mate, Neil Armstrong (not that one, another one), oddly enough racing a Civic Type R EP3 in club endurance racing who owned a small electrical firm making components for grey imports. If you had an import in the UK with a converted speedo, chances are, Cartek made it for you. These days Cartek in the UK makes much more elaborate items which are in use in many forms of motorsport including supply to OEM factory car producers such as Mercedes and their GT3 SLS – you’ll find the Cartek isolator in there.
As with the past, use of his parts is a must-have for me as it does what it says on the tin, it’s made in the UK and they are great people to deal with. A few favours pulled in and I had a nice box of bits arrive in the form of an isolator, rain light, coolant level indicator, main switch panel and a wireless steering wheel control gizmo. Bolt it in, wire it up and go.

For now I will leave you with this shot of the inside – if you squint at the picture you can imagine it looking close to being finished. The reality is somewhat different though as we prepare to get stuck-in. No doubt Christmas will see a bit of man-cave action on the car with a few days off work, after all, building a car on the evenings and weekends is never easy.
Before all that though, a new fridge, specifically to house the beer for the cave is on order as warm beer doesn’t get anything done. Once that’s in we are good to go. I did consider doing what Nakai-san from RWB did and keep all the old beer bottles on the shelf in the cave, but frankly, my beer game is stronger than his, it wouldn’t work.
Next time I hope to share some updates of the things we remove, what we do to them, what we test fit and install and show you what new stuff has arrived for our little car.
Cheers!
Andy Barnes
Photos by Jonathan Moore
More Project Car stories on Speedhunters
KM4SH related stories on Speedhunters


