
Everyone digs it when a road car looks like a race car.
It’s worked for manufacturers since the early days of the automobile, and a successful factory race program usually means more sales of normal models. It’s hardwired into us as car enthusiasts and we really do love having something just like the race cars we adore.

Nothing screams ‘race car’ quite as much as a set of racing harnesses, and that over the shoulder flick and click of the three, four or more clasps into a central buckle can bring a smile to even the most mundane day. In my cars, it’s one of the very first things I reach for after a seat and wheel.
Thinking back, it’s probably actually the third modification I made to the Cayman. There’s just something about being held firmly in place while driving that beats anything other mods can give. You can really feel what is going on in the chassis underneath you.
The trouble is, because we see racing belts as an important safety improvement in a race car, we automatically assume that they add safety to our road cars. It’s true that a harness is safer than a conventional inertia reel belt; the increased surface area in contact with the body transfers loads more evenly, and thanks to some really clever tech in the high-end belts they soften the deceleration in the event of a bump.
In truth, it’s not the actual belts that are in control of the safety; that can be won and lost in things as simple as improper mounting or not wearing them correctly. If you have harnesses in your car, do you really know the best way to use them and are you sure they are the most suitable belt secured in the ideal way? Let’s find out…
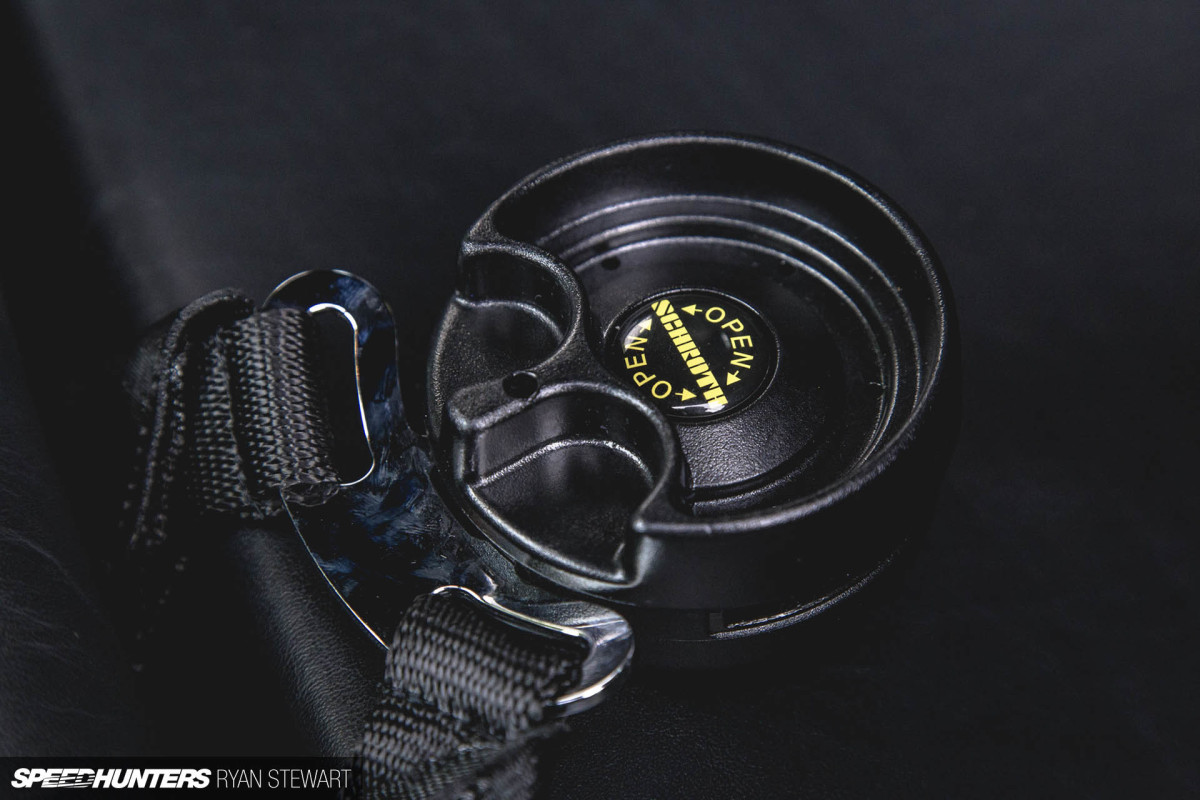
What’s Out There?Choosing your harness can be something of a minefield. With so many companies claiming to have the next best thing it’s hard to see the wood from the trees. What I can tell you is that you want to choose a harness from a manufacturer you can trust. There’s none trust worthier than Schroth. They are harnesses.
For over 70 years Schroth has been perfecting the art of passenger restraint in all forms; from racing cars to fighter jets and everything in between. If you’ve ever flown with Air Berlin or Lufthansa you’ll have already used a Schroth restraint.
Generally speaking, the most important choice comes in the form of 4-point or 6-point restraints. 4-point are considered entry level or clubman options, and the 6-point includes a ‘submarine’ restraint between the legs that stops you sliding under the harness in the event of a crash.
That said, Schroth has closed this gap by including ASM in their 4-point systems. ASM stands for anti-submarining and consists of an energy conversion device in the shoulder belts, helping stop the mass of the body trying to exit under the lap belt harness.
Five and six point harnesses feature a tangible anti-submarining fixture. This goes from the buckle down between your legs to either the floor or a separate bar. In my car I use a Schroth 6-point that attaches to a 997 GT3 submarine bar. It’s a factory fit item so I know that it’s up to the job.
Harnesses don’t just offer security in the event of a crash though. When travelling really quickly or out on circuit, a good bucket seat and harness can help secure you in place and allow you to concentrate more on the task at hand.
Fitting Harnesses CorrectlyNo matter if you are installing harnesses to get that race vibe in your car or if you are really concerned with occupant safety, you’ll certainly want to mount them in the right way. It sounds simple, but with a plethora of vehicles and cabin restrictions out there it can get pretty complicated.
No racing harness will function properly when installed in vehicles equipped with incompatible seats. Standard seats that have no headrests, or backrests with integrated headrests and no openings between the backrest and the headrest are non-starters. Most stock Porsche seats are like this, aptly named ‘tombstones’. In this type of seat the shoulder belts will simply slide off your shoulders during an accident, which isn’t ideal.
In my car I’ve gone a tried and tested route and installed Recaro seats. I’ve also put a harness bar as close to the back of these seats as possible. It’s important to keep the distance from seat to mounting point short as it reduces elongation of the belt in a crash, but more on that later.
Schroth says “the expected restraining function of any seat belt or racing harness can only be achieved by; optimised strap routing around and from the wearer’s body and optimised anchor point locations.” This means the harness performance is really about those two things: where the harness contacts the body and where it is mounted to the car.
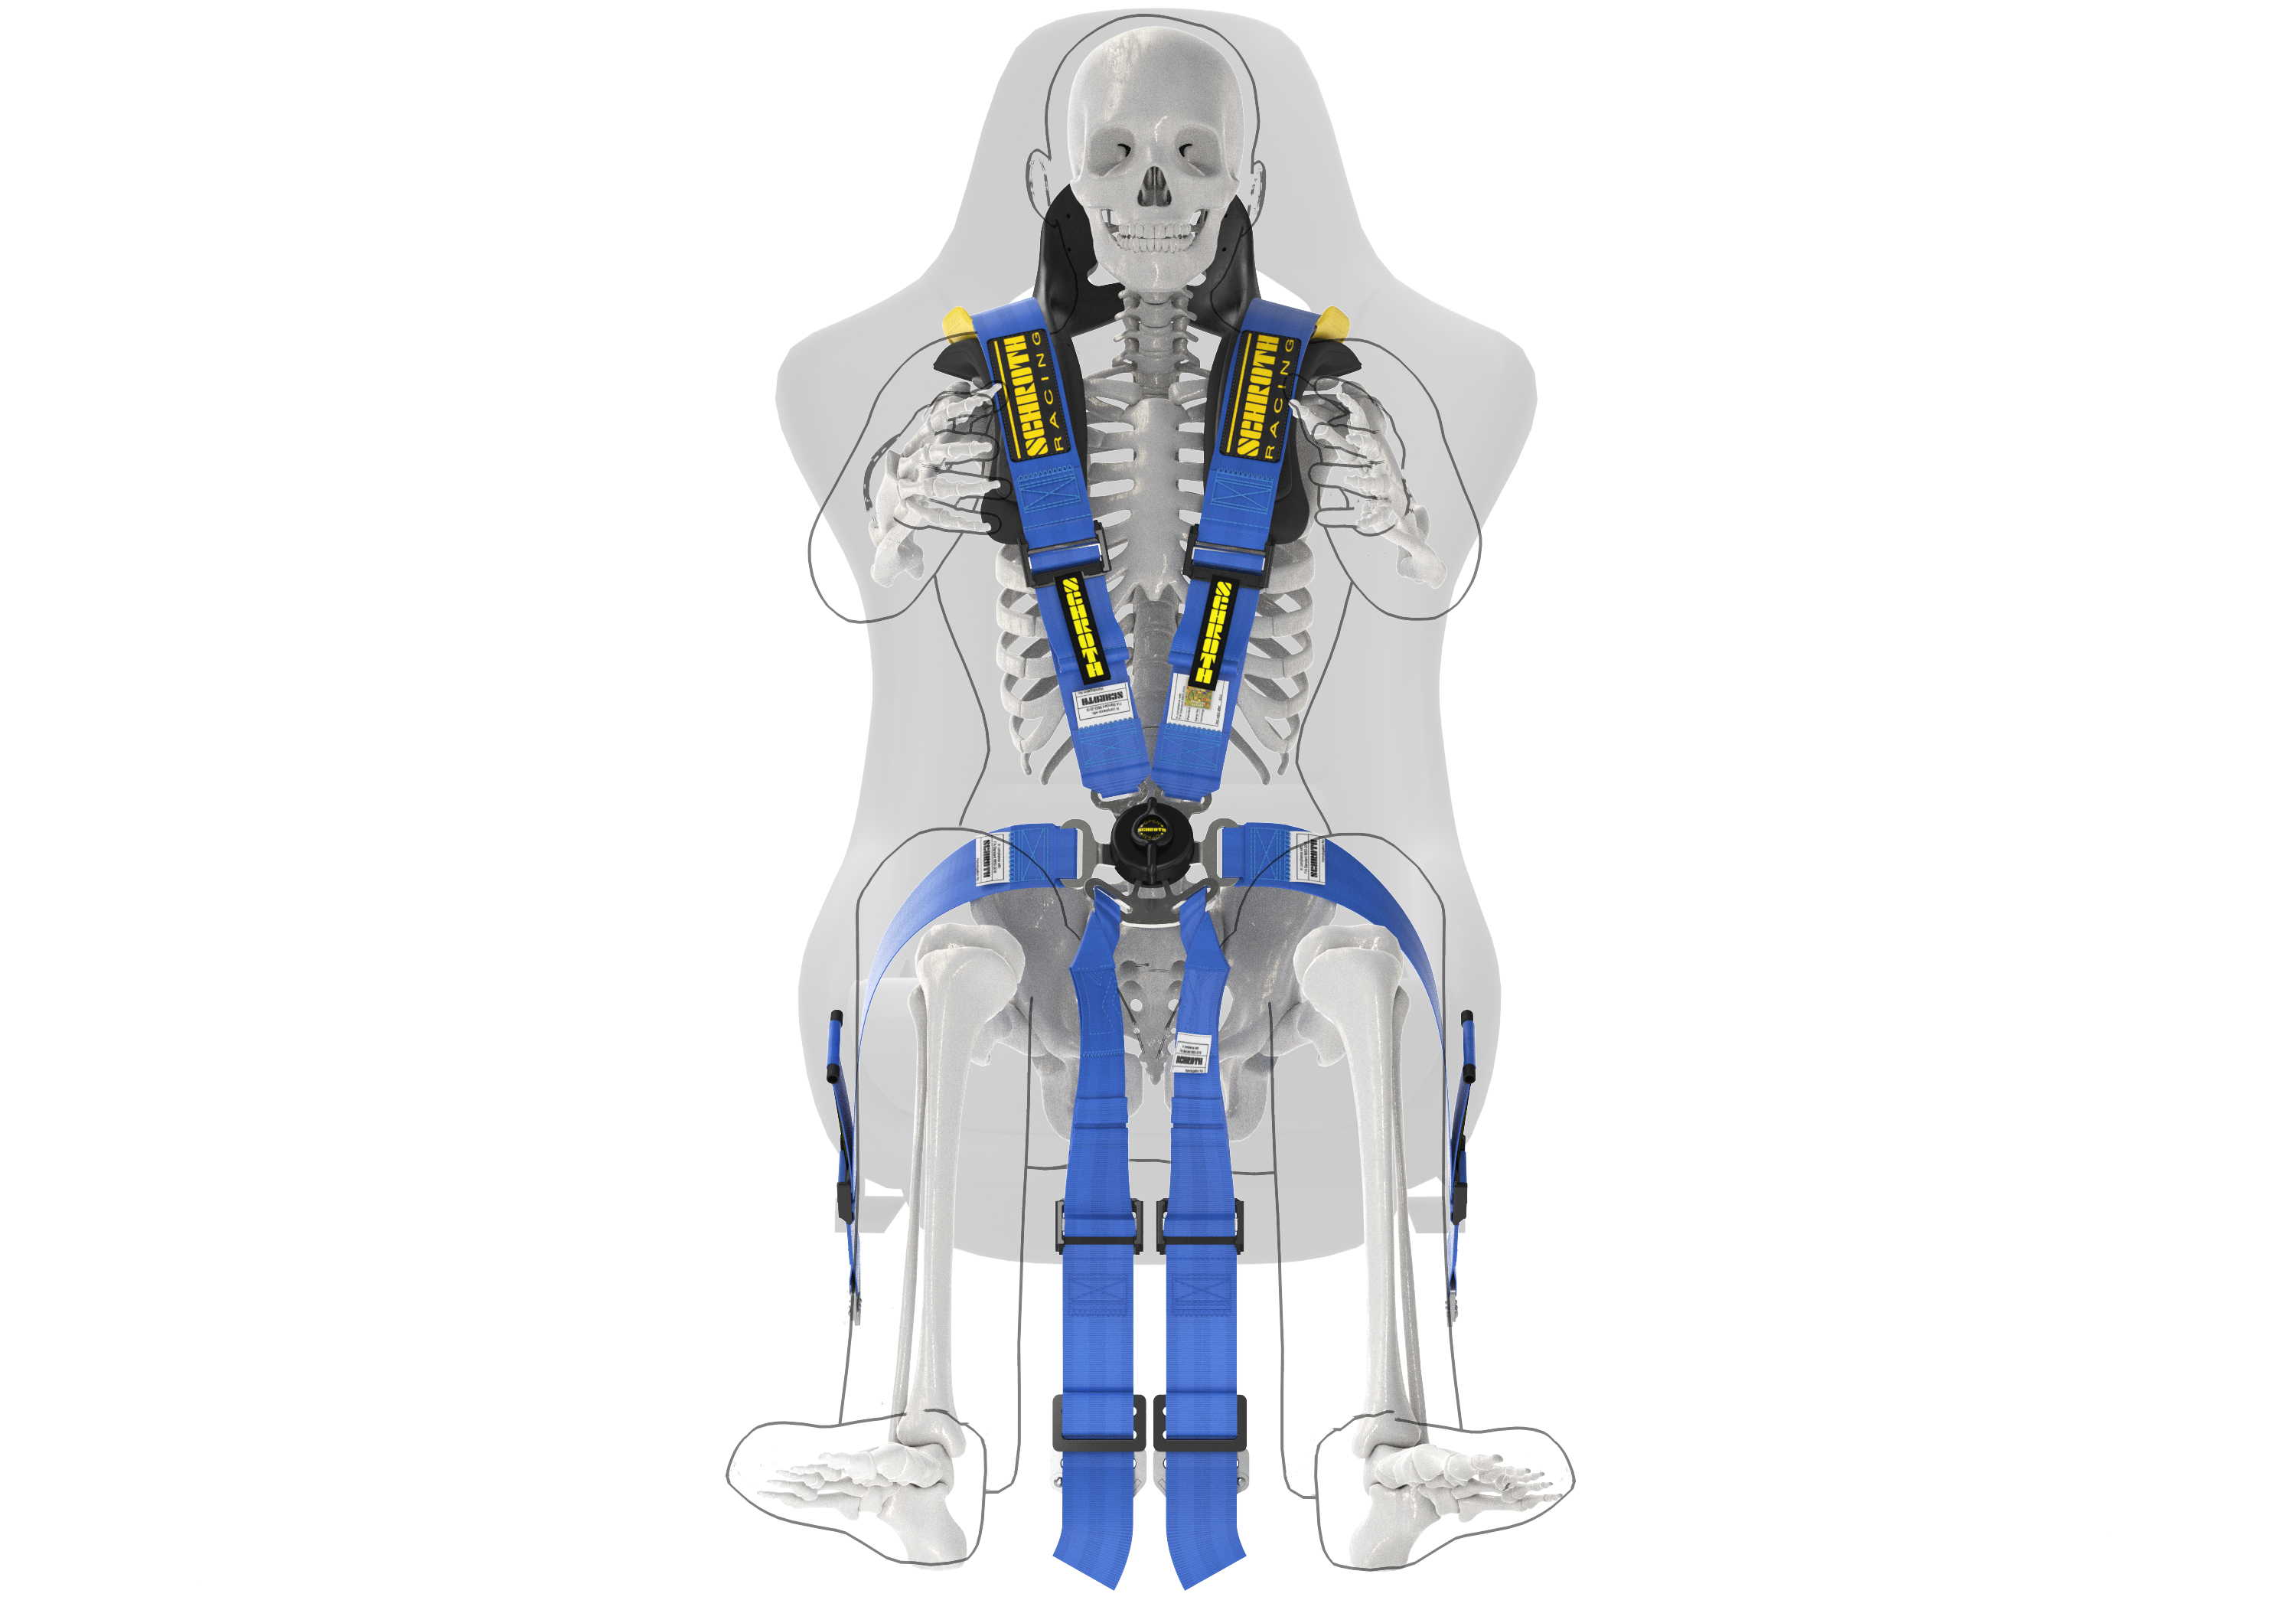
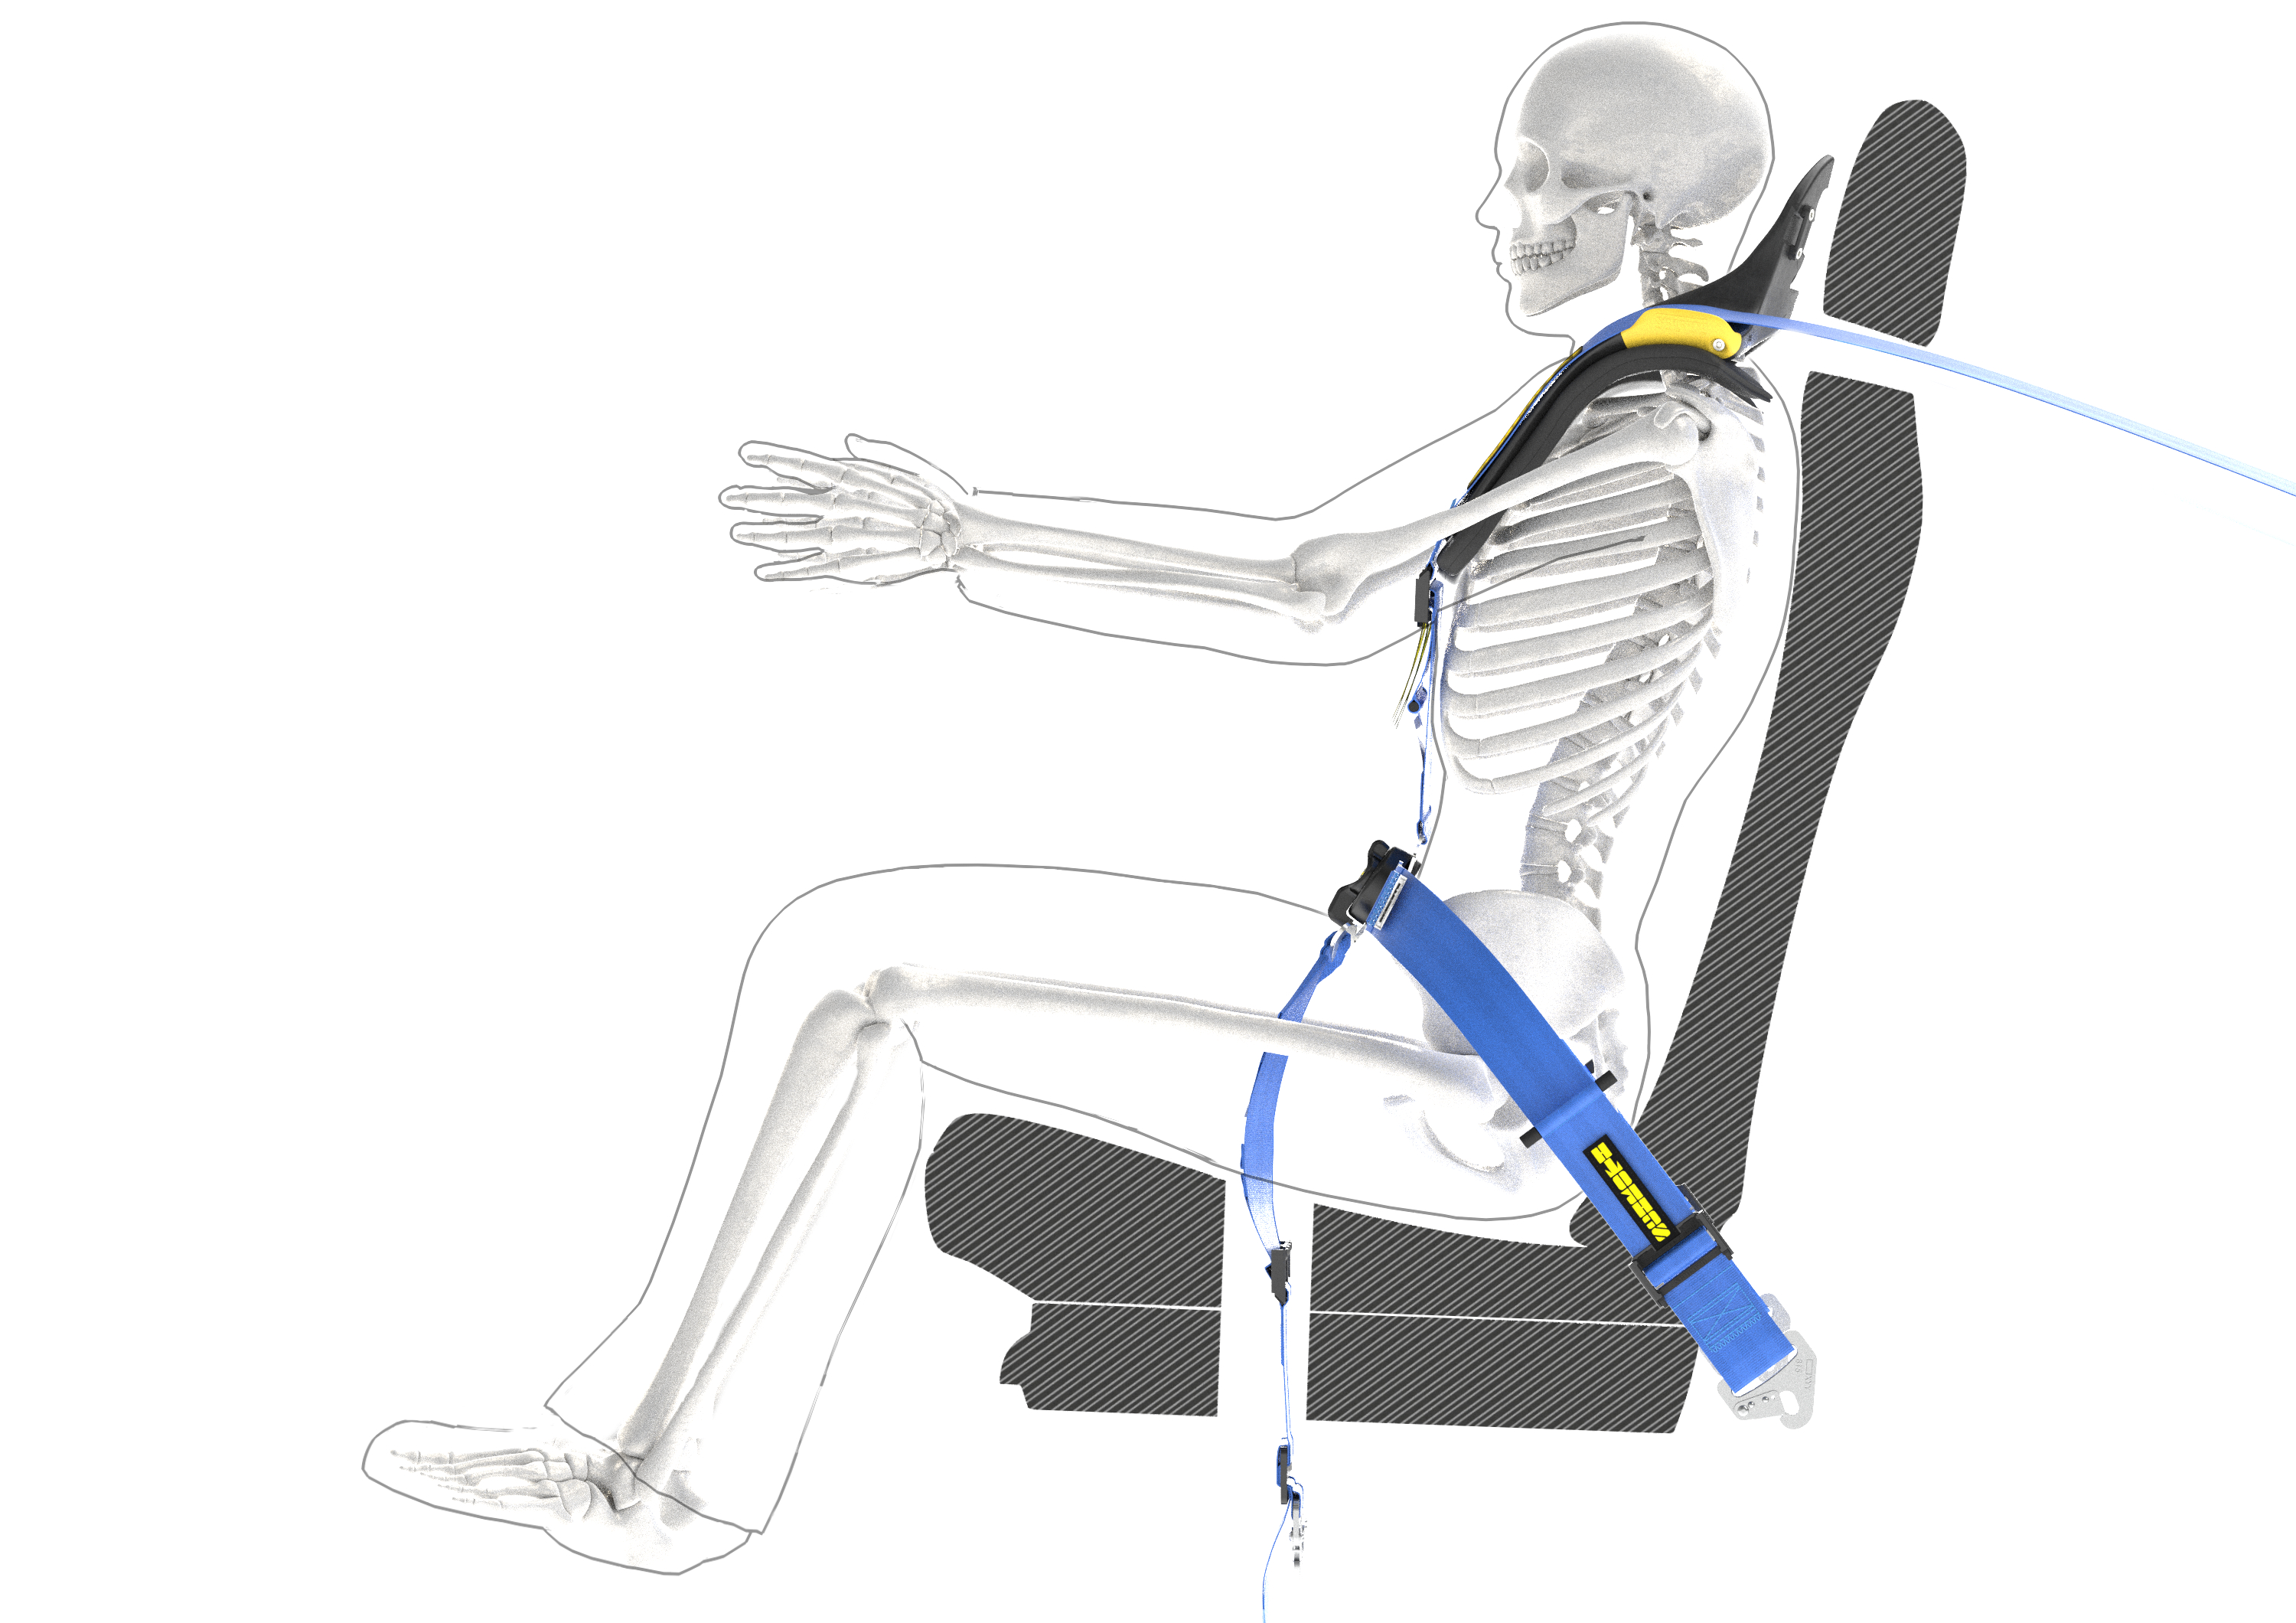
An occupant can only be effectively restrained through contact with the hard points of the body. This is where the load is transferred and the following parts are the most suitable: pelvic region, the thorax (or chest) and the clavicle (shoulders). The shoulders however are the most fragile, so can only be used to a certain limit. It is absolutely essential then that the straps of your harnesses follow this route.
The lap belt is another often overlooked but very important place where safety can be compromised. For optimal functionality, the lap belt strap length should be as short as possible. Ideally the distance between the lap belt anchor points should not be wider than the width of the pelvis or the outer width of the occupant’s bucket seat.
A distance of approximately 400mm (16”) is recommended by Schroth and it’s this dimension that a lot of harness installs can fall foul. Of course, if there are choices of several anchor points you should choose the ones that come the closest to these recommendations.
The lap belt straps should be routed over the pelvic bone to stay firmly and tightly in the crest between the pelvic bone and the upper thigh. You can feel this area clearly if you feel your thigh/pelvis while sitting down.
Another area where you can fall foul is with the shoulder belts. Shoulder belts must run from the shoulders horizontally or downwards at no more than a 20° angle. This is because at a larger angle the seat or your spine bares the load. Most OEM seats are not designed and tested to carry shoulder belt crash loads from and extreme downward installation (>20° downwards).
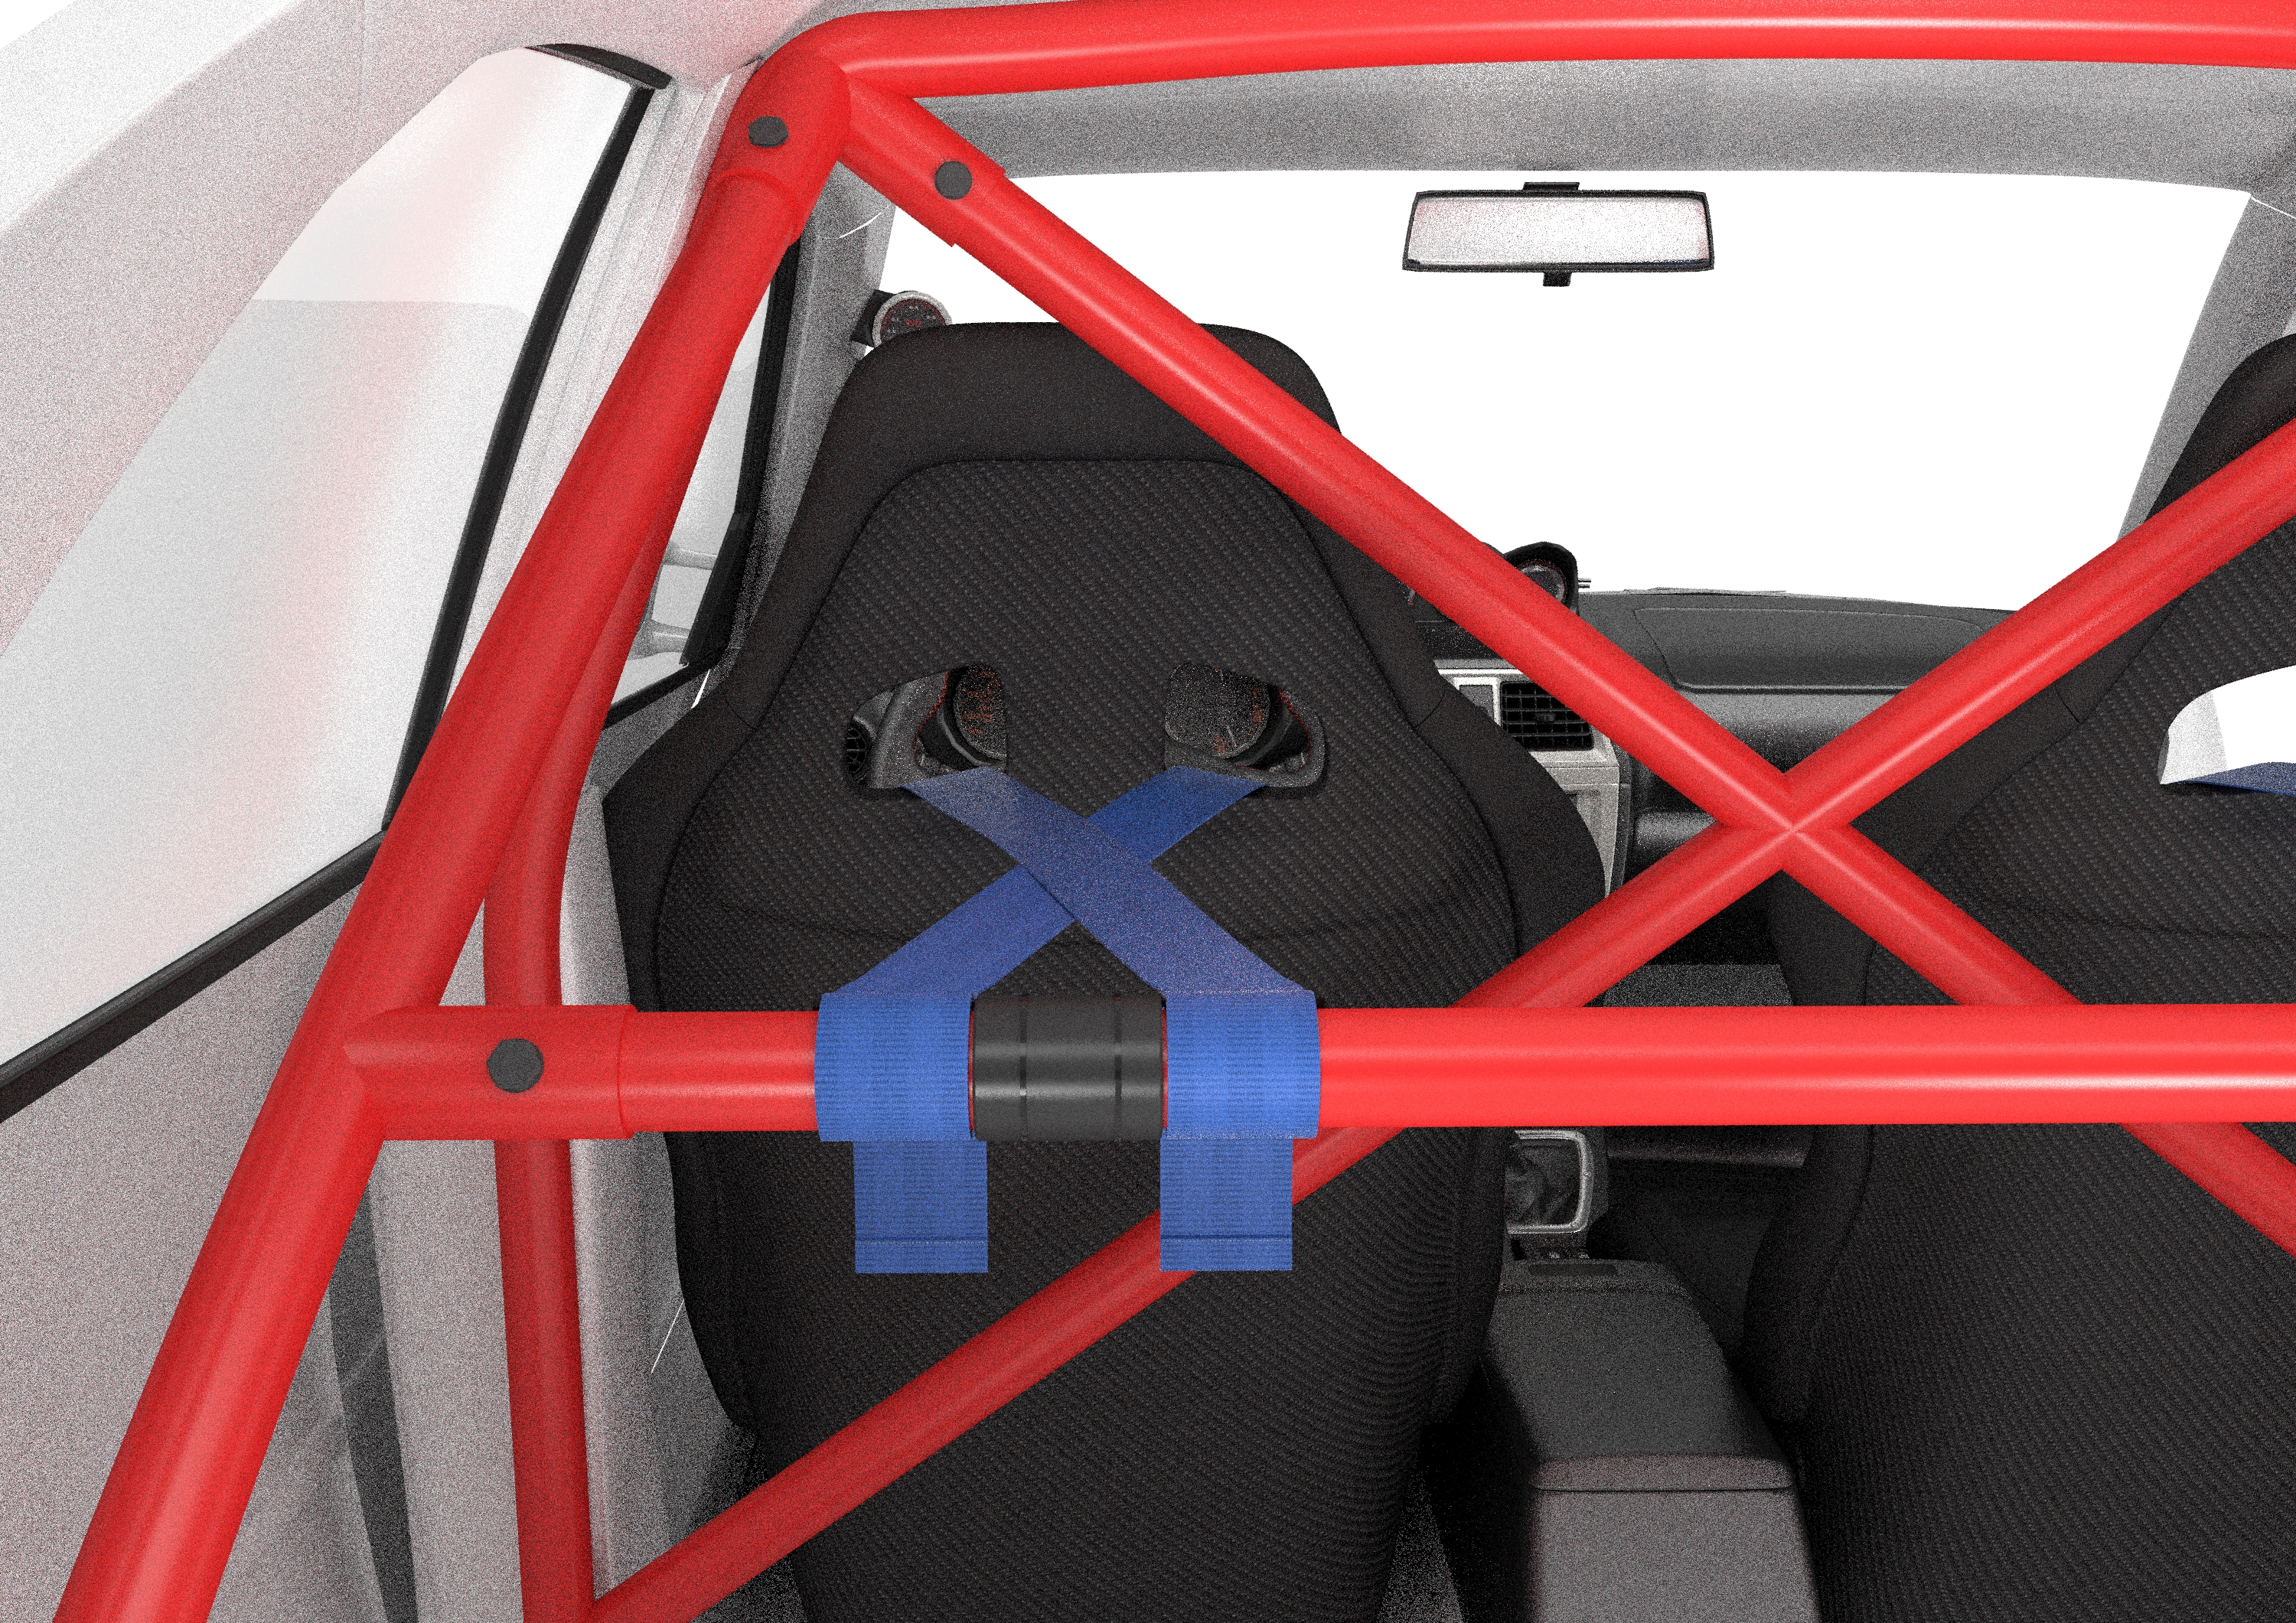
When picking the ideal spot to mount your shoulder belts, choose somewhere no further than 200mm (8”) from back of user’s seat. This isn’t always possible if you intend to use a roll cage bar for wraparound attachment, but there’s a fix for that. In this instance it’s best to mount the belts closer together or even cross them over.
Schroth recommend crossing harnesses over when they are fixed more than 500mm (20”) behind the seat back. Now you know why all those kanjo Civics do it; it’s not just a style thing!
What Happens When You Crash?As I mentioned earlier, Schroth test their products in real-world situations. They take an optimised installation with an upright seating position and put it through dynamic testing to ensure optimum safety. But what sort of forces are we talking about in the test?
The following figures are from a test simulating a 90° head-on collision with a 75kg (165lb) mass dummy and an impact velocity of 50km/h (31mph) – much slower than you might normally be travelling with a lighter occupant (certainly lighter than me!). The stopping distance is approximately 400mm (16”) with a maximum deceleration of 30g. This is known as the FIA Standard 8854/98 dynamic test requirement.
In this situation the pelvic load surpasses 14kN (3,100lb) at each side. It will elongate the lap belt and compress the tissue on the pelvis, and the pelvis will slide forward by 80-100 mm (3-4”). The upper torso load surpasses 7kN (1,550lb) on each strap; it will elongate the shoulder belts and the upper body will roll in. The shoulder belt adjusters will move up the chest by approximately 200mm (8”) and forward head trajectory will be up to 400mm (16”) These figures should really drive home why you should never wear a harness loose.
But we’re not finished yet. The pelvic movement combined with the shoulder belt forces will load the anti-sub straps to more than 6kN (1,320lb) each in a 6-point racing harness. In more reclined seating positions, the pelvic load will be reduced to around 9kN (2,000lb) since the seat pan, designed as a ramp, will take some of the load.
Therefore it is essential the seat or chassis manufacturer ensure the seat pan is strong enough not to bend or even collapse under extreme loads. As most people don’t sit at 90 degrees in their seat, it’s also a really important consideration. Seats are a significant component of the safety system, too.
I know some of you will be familiar with real racing incidents and may think the numbers above seem to be quite high. And you’d be right. Fortunately, most racing accidents are not 90° head-on collisions and car deformation is greater than the 400mm (16”). Modern soft walls also convert impact energy. This can sometimes mean that even accidents with higher impact speeds can be less severe than the FIA test setup.
Irrespective of this, Schroth racing harnesses have been tested to speeds and decelerations surpassing FIA requirements, and that’s one of the main reasons why I choose them for my cars.
So you’ve installed the lap belts and you’ve chosen your shoulder belt position but you haven’t got a clue how to wrap the harness around the roll bar correctly. You’re not alone. There’s a Schroth YouTube tutorial out there with 150K views, a decent proportion of them are probably mine over the years.
There’s two types of fixture that can be used with a Schroth harness called the 3-bar slide and the lightweight d-ring. The d-ring is lighter than the 3-bar slide, surprisingly, but they both offer the same security. It’s really important that you thread these properly as it’s all that is keeping your shoulder straps fixed in place. Here’s some pointers:
3-Bar Slide
1. Slide the webbing through slot 1 and 2 as shown, ensuring that the protruding strap end is long enough to have sufficient webbing length available for the following wrapping procedure. A minimum of 360-400mm (14-16”) is recommended.
2. The 3-bar slide shall be positioned as close as possible to either the roll cage bar or to the end bracket.
3. Wrap the free strap end from underneath around the roll cage bar or through the webbing slot of an end bracket.
4. In case of the combination of a 50mm bracket slot and 75mm webbing, fold the webbing in as shown.
5. Wrap webbing back through slot 2 and 1.
6. Fold strap end back and run it through slot 2 again.
7. Ensure the strap end protrudes at least 100mm (4“) or even longer from slot 2. If it is less than 100mm, disassemble and start over again. If longer, roll in the strap end and fix it by a cable tie to the shoulder belt.
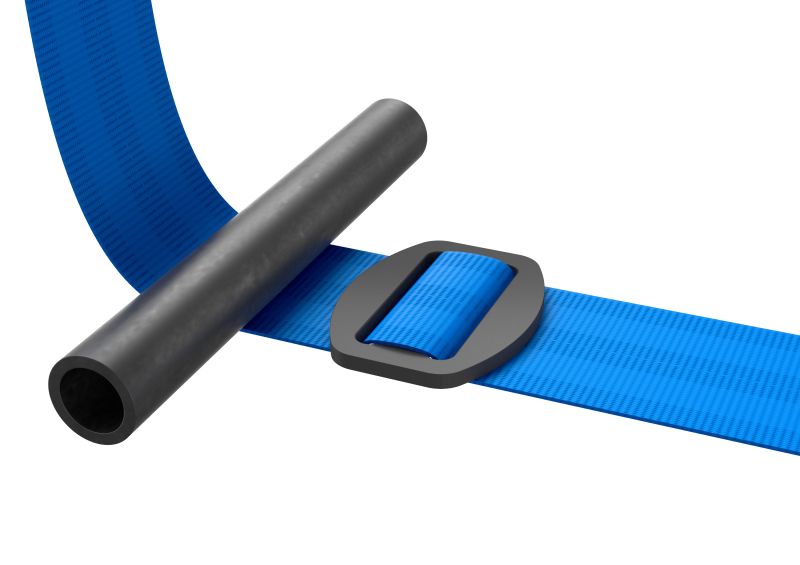


Lightweight D-Ring
1. Position d-ring slide to roll bar with wider bar at the top.
2. Slide a minimum of 600mm (24”) of strap length through the d-ring slide from underneath the roll bar. This is your first loop.
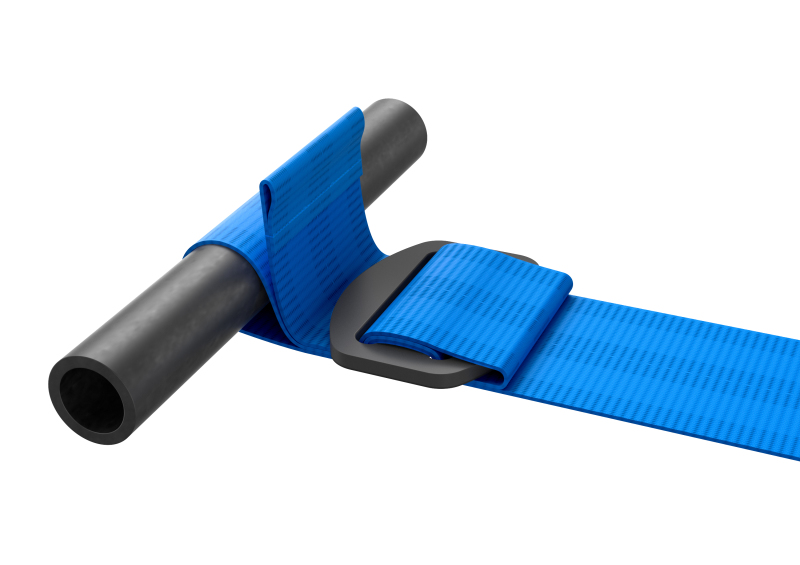
3. Slide strap from top through d-ring slot towards roll bar and back between roll bar and first loop until it protrudes from slot in d-ring.
4. Pull shoulder strap and check that wrap will tighten when loaded.
5. Wrap strap end around roll bar again; this is the third loop. Thread through the d-ring slide again. The shoulder belt is now firmly wedged between first loop webbing and protruding strap end.
6. Make sure strap end protrudes at least 100mm (4”)
Getting the wrap snug to the bar is the key; incorrect wrapping or slides wrapped too far away from the roll cage bar might allow the webbing to slide during an accident, which is really bad news. In extreme cases you might me making some seriously hard impact with the steering wheel with your face. It sounds comical but I bet it’s not when it happens.
As you can see, there’s a lot to consider. But it’s really about thinking about those forces discussed in the test procedure. With all that loading you want to be sure that you will remain fixed in place by the harness.
A racing harness gives great peace of mind, and with a correctly installed harness system you can be safe in the knowledge that should you impact anything you will be as safe as possible.
Ryan Stewart
Instagram: 7.nth
ryan@speedhunters.com